
GC Notify uses the spreadsheet to populate your template, sending a customized message to each recipient.
Create spreadsheet columns for custom content
You must give column headings the same name as the corresponding message variable. If you have a template, GC Notify can create the columns for you. The column headings will follow the order in which variables appear in your template.
For email messages, the first column is the email address. For text messages, the first column is the phone number.
You’ll include a row for every recipient. The recipient’s row gives their custom content for each variable.

Customize links
You may want to customize links for specific spreadsheet recipients. For example, different age groups might need different links.
Option 1: All messages use the same words for the custom link.
- In the template, select the words for the link.
- Open the link button on the toolbar.
- In the link box, enter double brackets.
- Between the double brackets, enter name of the spreadsheet column that holds custom links.
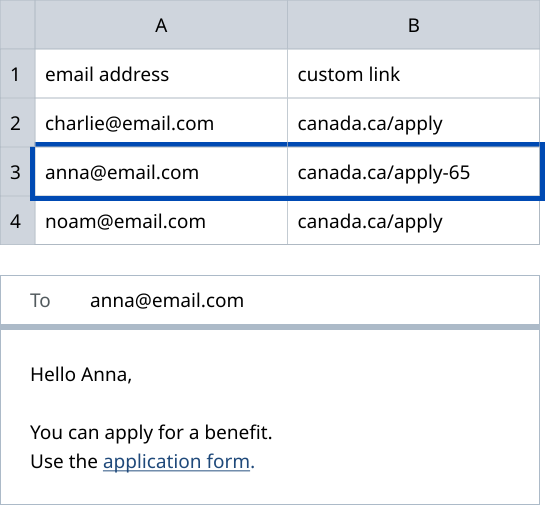
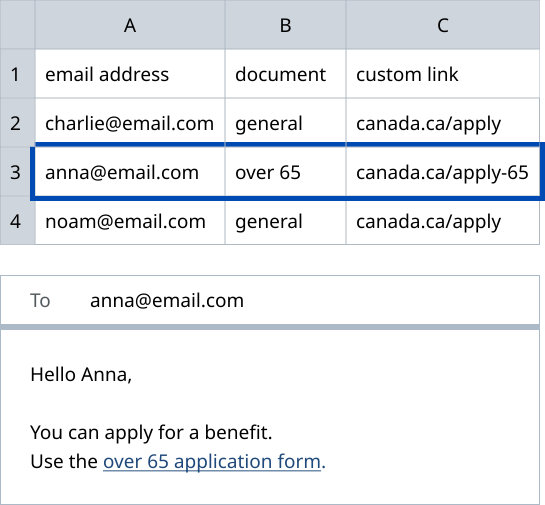
Option 2: Message uses different words for the custom link.
- In the template, use the toolbar button to add a variable.
- Next, replace the word “variable” . Instead enter the name of the spreadsheet column with the words for the custom links.
- Select the column name.
- Open the link button on the toolbar.
- In the link box, enter double brackets.
- Between the double brackets, enter the name of spreadsheet column that holds custom links.
Filter spreadsheet content to a subgroup of recipients
Include a column for the conditional content. Insert “yes” if the recipient meets the condition, and “no” if they do not.
Upload spreadsheet and preview messages
Check that all variables have populated correctly. When ready, you’ll send the customized messages. You can send up to 50,000 messages at once.
